
Introduction
This guide walks you through a step-by-step migration from WSO2 API Manager 4.0.0 to 4.4.0. You’ll learn exactly how to upgrade your environment, tackle common issues, and avoid downtime wherever possible.
Prerequisites:
- WSO2 Subscription: You need an active subscription and a support ticket to access all official migration and upgrade scripts.
- Access: You should have admin access to your WSO2 servers and databases.
- Familiarity: Basic understanding of your existing WSO2 AM setup and infrastructure.
Migration Overview:
The process involves upgrading first to 4.2.0, then to 4.4.0. Along the way, you’ll make several database and configuration changes, validate APIs, and ensure your environment remains stable.
In this guide, I’ll show the steps I used in a real-world environment with:
- Two control plane nodes
- One external and one internal gateway group
- An external Identity Server
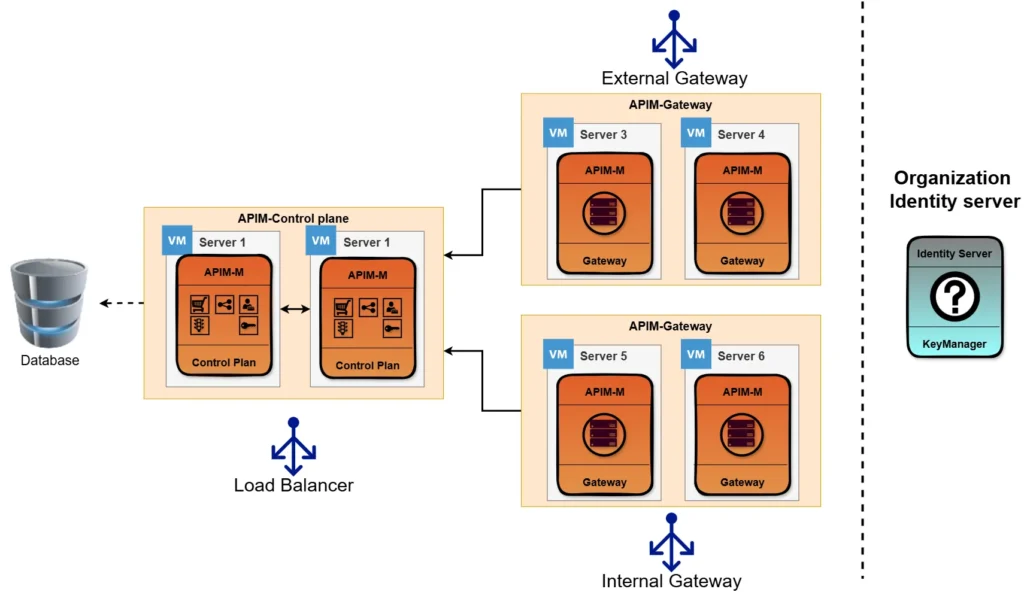
If you use WSO2 Identity Server or the built-in key manager, some details may differ. Please consult the relevant WSO2 documentation for those scenarios.
Migration Strategies:
There are two main ways to approach this migration:
- Side-by-side installation: Set up WSO2 AM 4.4.0 alongside your current 4.0.0 instance, then switch over when ready. This method minimizes downtime.
- In-place database migration: Migrate the database in the background, then stop 4.0.0 and start 4.4.0. This works best if you use an external key manager, but some APIs may see downtime.
For most users, I recommend the side-by-side approach for maximum stability and control.
Pro Tip:
Test your database migration a few weeks ahead of the real cutover. This lets you catch broken APIs or issues early—saving you from last-minute surprises.
Database
The first step is to prepare your database for migration.
1. Create New Database Copies
Start by creating copies of your production databases for the migration environment. In this example, we use PostgreSQL.
Assuming your current databases are named wso2_am_db and wso2_shared_db, you can run:
CREATE DATABASE wso2am_am WITH TEMPLATE wso2_am_db OWNER wso2_apim;
CREATE DATABASE wso2am_shared WITH TEMPLATE wso2_shared_db OWNER wso2_apim;Now you have clean databases ready for the 4.2.0 upgrade.
2. Update Database for 4.2.0
Before running the migration scripts, update your new databases with the required indexes:
CREATE INDEX IF NOT EXISTS REG_RESOURCE_TAG_IND_BY_REG_TAG_ID ON REG_RESOURCE_TAG(REG_TAG_ID, REG_TENANT_ID);
CREATE INDEX IF NOT EXISTS REG_RESOURCE_PROPERTY_IND_BY_REG_PROP_ID ON REG_RESOURCE_PROPERTY(REG_TENANT_ID, REG_PROPERTY_ID);Note:
The WSO2 migration guide recommends running the migration with a PostgreSQL superuser. In most cases, a standard user with the correct privileges will work. Only use a superuser if you encounter permission errors.
3. Ready to Migrate
Your database is now ready for the WSO2AM 4.2.0 migration.
Migration Environment
Before running the migration, set up a dedicated migration environment. This is a temporary WSO2AM 4.2.0 instance, used only for the upgrade process—not for normal production use.
Recommended Approach:
- Use a Docker image or a disposable VM for consistency and easy rollback.
- No need to fully configure all profiles; you only need the minimal setup to perform migration tasks.
Steps:
1. Download and prepare WSO2AM 4.2.0
Download WSO2AM 4.2.0, apply the latest patches, and package it (e.g., as wso2-4.2.0.XXX.zip).
2. Create a dedicated deployment.toml
Use the default deployment.toml from 4.2.0 as your template.
Set the admin password and keystore:
[super_admin]
username = "admin"
password = "$env{ADMIN_PASSWORD}"

[keystore.tls]
file_name =  "keystore-tls.jks"
type =  "JKS"
password =  "$env{KEYSTORE_TLS}"
alias =  "serverCert"
key_password =  "$env{KEYSTORE_TLS}"

[keystore.primary]
file_name =  "keystore-internal.jks"
type =  "JKS"
password =  "$env{KEYSTORE_INTERNAL}"
alias =  "encryptkey"
key_password = "$env{KEYSTORE_INTERNAL}"database connection to match your migration databases
[database.apim_db]
type = "postgre"
url = "jdbc:postgresql://$env{DATABASE_URL_APIM}"
username = "$env{DATABASE_USERNAME}"
password = "$env{POSTGRES_PASSWORD}"
driver = "org.postgresql.Driver"
validationQuery = "SELECT 1"
pool_options.maxActive = 150
pool_options.maxWait = 30000
pool_options.minIdle = 5

[database.shared_db]
type = "postgre"
url = "jdbc:postgresql://$env{DATABASE_URL_SHARED}"
username = "$env{DATABASE_USERNAME}"
password = "$env{POSTGRES_PASSWORD}"
driver = "org.postgresql.Driver"
validationQuery = "SELECT 1"
pool_options.maxActive = 150
pool_options.maxWait = 30000
pool_options.minIdle = 5Finally add your gateway environments
[[apim.gateway.environment]]
name = "internal"
type = "hybrid"
display_in_api_console = true
description = "This is a hybrid gateway that handles both production and sandbox token traffic."
show_as_token_endpoint_url = true
service_url = "https://localhost:${mgt.transport.https.port}/services/"
username= "${admin.username}"
password= "${admin.password}"
ws_endpoint = "ws://localhost:9099"
wss_endpoint = "wss://localhost:8099"
http_endpoint = "http://localhost:${http.nio.port}"
https_endpoint = "https://localhost:${https.nio.port}"
websub_event_receiver_http_endpoint = "http://localhost"
websub_event_receiver_https_endpoint = "https://localhost"

[[apim.gateway.environment]]
name = "external"
type = "hybrid"
display_in_api_console = true
description = "This is a hybrid gateway that handles both production and sandbox token traffic."
show_as_token_endpoint_url = true
service_url = "https://localhost:${mgt.transport.https.port}/services/"
username= "${admin.username}"
password= "${admin.password}"
ws_endpoint = "ws://localhost:9099"
wss_endpoint = "wss://localhost:8099"
http_endpoint = "http://localhost:${http.nio.port}"
https_endpoint = "https://localhost:${https.nio.port}"
websub_event_receiver_http_endpoint = "http://localhost"
websub_event_receiver_https_endpoint = "https://localhost"3. Prepare the migration environment script
Use a shell script or Dockerfile to automate the setup:
#!/bin/bash
echo "Unpack WSO2AM 4.2.0"
unzip wso2-4.2.0.XXX.zip

echo "Apply deployment.toml"
cp deployment-4.2.0-migration.toml wso2am-4.2.0/repository/conf/deployment.toml

echo "Add the latest database driver"
cp postgresql-42.7.X.jar wso2am-4.2.0/repository/components/lib/

echo "Remove default keystores"
rm -r wso2am-4.2.0/repository/resources/security/*.jks

echo "Add your keystores from the 4.0.0 environment"
cp keystore/"$ENV_NAME"/client-truststore.jks wso2am-4.2.0/repository/resources/security/
cp keystore/"$ENV_NAME"/internal-keystore.jks wso2am-4.2.0/repository/resources/security/
cp keystore/"$ENV_NAME"/tls-keystore.jks wso2am-4.2.0/repository/resources/security/Tip:
Automating these steps ensures a clean, repeatable migration environment every time.
Keymanager Migration
Even if you aren’t using the built-in WSO2 Key Manager, you must run this migration step.
Steps:
1. Prepare the environment
Copy the needed resources to the environment you prepared this resources is provided by WSO2
echo "Copy migration resources"
cp -r migration-resources wso2am-4.2.0

echo "Copy the identity migration JAR"
cp org.wso2.carbon.is.migration-1.1.170.jar wso2am-4.2.0/repository/components/dropins/2. Navigate to the migration environment you prepared using WSO2AM 4.2.0.
Go to the bin directory:
cd wso2am-4.2.0/bin3. Run the identity migration command:
sh api-manager.sh -Dmigrate -Dcomponent=identity4. Wait for the process to complete.
You’ll know it’s finished when you see the /devportal and /publisher URLs appear in the console output.
Note:
This step is required regardless of your Key Manager setup. It updates essential internal data structures to ensure compatibility with 4.2.0 and later.
API Pre-Migration Step
This step helps you identify any APIs with issues that might prevent them from working after the upgrade to WSO2AM 4.2.0 and beyond. In version 4.2.0, WSO2 introduced stricter API policy validation—so APIs with broken Swagger/OpenAPI definitions may fail.
Steps:
1. Remove Identity Migration Files
Remove the files from Keymanager (identity) migration earlier, remove those resources:
rm -rf wso2am-4.2.0/migration-resources
rm wso2am-4.2.0/repository/components/dropins/org.wso2.carbon.is.migration-1.1.170.jar2. Add API Migration Files
Copy in the API migration resources provided by WSO2:
cp -r migration-resources-am/migration-resources wso2am-4.2.0/
cp migration-resources-am/dropins/org.wso2.carbon.apimgt.migrate.client-4.2.0.67.jar wso2am-4.2.0/repository/components/dropins/3. Run the Pre-Migration Validation
From the bin directory, run the following command:
cd wso2am-4.2.0/bin
sh api-manager.sh -Dmigrate -DmigrateFromVersion=4.0.0 -DmigratedVersion=4.2.0 -DrunPreMigration4. Review the Output for Errors
- Watch the logs for warnings or errors, especially those related to Swagger/OpenAPI validation.
- Any API that triggers a validation error will not work after migration and needs to be fixed.
Pro Tip:
Fix all API validation errors before proceeding with the full migration. This prevents broken APIs in production and saves troubleshooting time later.
API Migration Step
Once you’ve fixed any validation issues found in the pre-migration check, you’re ready to migrate your APIs and related data from 4.0.0 to 4.2.0.
Steps:
1. Navigate to the Migration Environment
Go to the bin directory of your WSO2AM 4.2.0 migration environment:
cd wso2am-4.2.0/bin2. Run the API Migration Command
This step will migrate all relevant API data, subscriptions, and configurations to the 4.2.0 schema.
Execute the migration command:
sh api-manager.sh -Dmigrate -DmigrateFromVersion=4.0.0 -DmigratedVersion=4.2.03. Wait for Completion
The process may take some time depending on the number of APIs and the size of your data. Wait for the migration script to finish.
Tip:
Always check the logs for any errors or warnings after migration. Address issues before proceeding to the next stage.
Cleanup WSO2AM-4.2.0
After successfully migrating your APIs and data, you no longer need the temporary 4.2.0 migration environment.
Steps:
1. Remove the Migration Instance
Delete or archive the entire WSO2AM 4.2.0 migration directory.
2. Why Cleanup?
- The migration environment is only needed for upgrade scripts.
- Keeping it can lead to confusion or accidental use later.
Note:
You never need to start WSO2AM 4.2.0 for your normal operations—its only purpose was migration.
Database Migration to WSO2AM 4.3.0 & 4.4.0
Next, you need to update your database schema for compatibility with WSO2AM 4.3.0 and 4.4.0. This step uses migration scripts provided by WSO2 support.
Note:
Starting with WSO2AM 4.2.0, WSO2 has simplified the migration process. Now, you only need to apply the provided database migration scripts. When you start the new WSO2AM server, any remaining schema changes required for the upgrade will be applied automatically by the server itself. Manual data adjustments are no longer necessary.
Steps:
1. Obtain Migration Scripts
Get the official migration scripts for upgrading from 4.2.0 → 4.3.0 and from 4.3.0 → 4.4.0 from WSO2 support.
2. Run the 4.2.0 to 4.3.0 Migration Script
- Execute the 4.2.0 to 4.3.0 script against your
wso2am_amdatabase:
3. Run the 4.3.0 to 4.4.0 Migration Script
- Next, execute the 4.3.0 to 4.4.0 script on the same database:
With this done we are now upgraded our database to WSO2AM 4.4.0
Start WSO2AM 4.4.0
Now it’s time to launch your upgraded WSO2AM 4.4.0 environment.
Steps:
1. Update Customizations
Apply any custom configurations or files from your previous 4.0.0 installation to the new 4.4.0 setup (e.g., custom themes, configuration files, deployment settings).
2. Adjust deployment.toml for Re-indexing
Before starting the 4.4.0 control plane for the first time, increase the re-indexing value to trigger data reindexing,
[indexing]
re_indexing = 103. Stop the Old WSO2AM 4.0.0 Control Plane
Ensure the old instance is fully shut down to avoid conflicts.
4. Start the WSO2AM 4.4.0 Control Plane
- Start your new 4.4.0 control plane and monitor the logs for any errors.
- Access the Dev Portal and Publisher to confirm the environment is running correctly.
5. Restart All Gateways
- Shut down and start all gateway nodes to complete the migration to 4.4.0.
Tip:
Double-check that all APIs and integrations are functioning as expected. Test the full workflow before considering the migration finished.